Rainbow Loom on Access Hollywood LIVE
1 Reply

Rainbow Loom – Three Pin Chain pattern
It’s finally happened. I’ve been using my Rainbow Loom long enough that I actually created a new pattern. At least it is one that I can’t find described or pictured anywhere else. I call it the 3 pin chain. Although the construction is somewhat similar to the 3 pin fishtail, the result is quite different. If you’ve made any sort of Rainbow Loom fishtail before, you should be able to make this new 3 pin chain after looking through these instructions.
Step 1. Reposition your loom to look like the pictures shown here, where the middle colum is shifted up. Notice that this is the end of the loom opposite the starting arrows.


Step 2. Place 3 separate bands each in a figure 8 in order to form a triangle over the 3 pins as shown here:


First three bands for 3 pin chain
Step 3. In the next layer, place 3 separate bands (straight on) to form the triangle.

Bands for second layer
Step 4. Start forming your chain by looping the bottom layer of bands over the pins, as in a fishtail pattern. The difference here is that you have only 2 layers on (instead of 3) when you are looping the bottom layer over. Also, you are using 3 bands to form the triangle within each layer, instead of just 1 band as in a fishtail pattern.


Loop the bottom layer of bands up over the top layer. Do this for all 3 pins.
Step 5. Continue adding 3 bands in a triangle layer and looping the bottom layer up until your chain is as long as you want. Pull your chain down as you go to make it easier. I think this pattern looks best if you use a single color for each layer. Finish your creation with a final band and a c clip (or keychain ring).

Start of the Rainbow Loom 3 pin chain
I had recently made the wreath and candy cane patterns from Kim S. at madebymommy.com. As I was trying different things, I somehow stumbled upon the 3 pin chain pattern. I used the 3 pin chain to make a wreath and candy cane that look very similar to those created by her, but they are larger. Thank you to Kim and to all of you who share your Rainbow Loom creations for helping to inspire me. Happiness is Looming!

Left side – patterns from MadeByMommy.com. Right side – creations made from 3 pin chain pattern.
Need some Halloween inspiration for Rainbow Loom? Here are some ideas to get you started.
1. Basic Bracelets. Simple single chain bracelets in Halloween colors make a great hand-out item for any Trick-Or-Treaters that come by your house.

2. Halloween Necklace. Check out this great tutorial for a Rainbow Loom necklace in halloween colors.
http://www.youtube.com/watch?v=FqK0OYR_4ds&feature=player_detailpage

3. Candy Corn inspired beaded Rainbow Loom bracelet. From the Rainbow Loom facebook page. Great work!

4. Pumpkin charms. There is a video and instructional printout available to help you make this Pumpkin charm.
5. Rainbow Loom ghost charm. Here’s a fun one I also spotted on the Rainbow Loom facebook page.

6. Rainbow Loom pumpkin key chain. For this design you will need 2 looms attached side-by-side. Use the same technique as for a triple single, except use two bands for all the rows and put the cross-wise bands across all 5 rows.


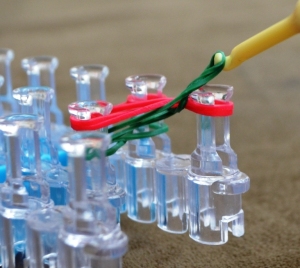
hold the Rainbow Loom hook like a pencil
Who knew that a simple hook could do so much? The most important thing you need to know about the Rainbow Loom hook is how best to hold it. It will be much easier to use the Rainbow Loom if you hold the hook just like a pencil. This is one reason the RL is a great item for young kids, because it helps them develop and improve their pencil grasp.

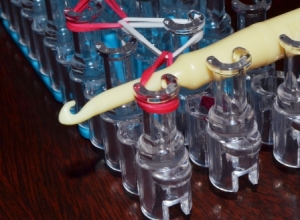
pull the hook up through the center/inside of the pin
The next thing you need to know is how to best utilize the curved pegs (or pins) on the loom. In most patterns, it is easiest to bring the hook up through the ‘inside’ of the curve, like shown here. The unique shape of the pins is what makes the Rainbow Loom much easier to use than some of the ‘knock-off’ products.

Rainbow Loom hook and ordinary crochet hook

Rainbow Loom hook parking spot
The third thing to know about the Rainbow Loom hook is how awesome it is! This is not just an ordinary crochet hook, it is a four-in-one marvel. Here are the key features of the hook:
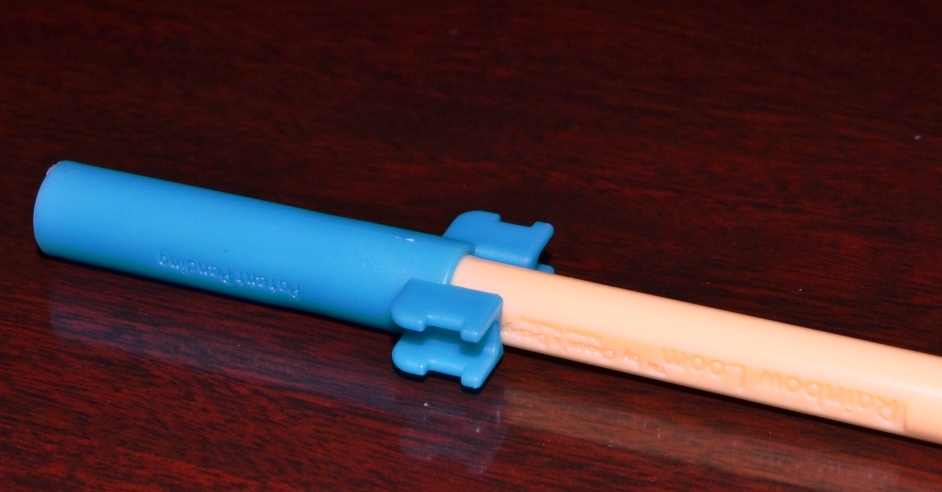
hook with mini loom cover
3. The larger end is perfectly shaped to help you take apart the loom itself. Check out my other post at rainbow-loom-square-position/ to see what I’m talking about.
4. The wider end of the tapered part has an edge that helps it fit perfectly and solidly into the blue cover. This cover even has multiple purposes. It helps keep your hook from getting broken or from poking someone, and it can be used on its own to create Rainbow Loom bracelets.
Here is my latest creation. This pattern is called a 3 Pin Fishtail. I made the bracelet first using black and 2 colors of purple. Then I wanted a necklace to match, but I didn’t want to make that long of a Rainbow Loom fishtail. So, I got the idea to just make a short fishtail and loop it into a pendant. I put the mini-fishtail onto a basic black cord and knotted that to a ‘lobster clasp’.
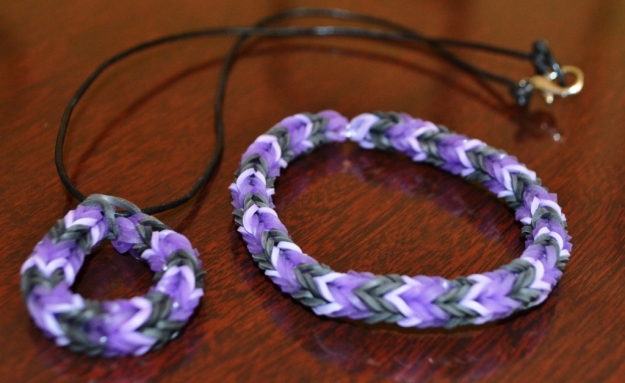
You can learn how to make the 3 Pin Fishtail pattern here:
You can buy the cord and lobster clasp at Michaels in the jewelry making section. Michaels has cords with the clasps already attached or you can buy the specific type of cord and clasps you want. Here’s a quick definition of a lobster clasp: http://en.wikipedia.org/wiki/Lobster_clasp
Have a great DIY day!
OK, maybe I have some obsessive tendencies. I have made the standard bracelet in over 20 different colors – almost every color of Rainbow Loom band that Michaels sells now. If you are wondering what all the colors are, check this out:

From left to right the colors are:
I think I am missing lime green, turquoise, neon orange, and maybe a transparent green. I hereby challenge you to make 20+ bracelets, each in a different color. Do you accept the Rainbow Loom color challenge?
You may be wondering, “Did she spell #4 correctly?”. I did my research on this one. http://petscribbles.blogspot.com/2012/02/is-it-fuchsia-or-fuschia.html

Standard loom position

Use other end of hook to help take loom apart
Rainbow Loom square position

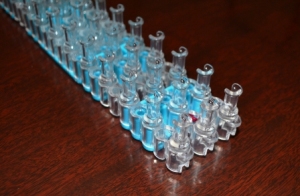
Rainbow Loom parts
You can completely take apart the loom, and you will end up with 6 parts. There are the 3 columns of pegs, 2 small blue pieces, and 1 big blue piece. For certain types of patterns, if you want to make them very long they can be made more easily by connecting two looms end to end. You can use the big blue piece to bridge two sets of peg columns together.
Happy Looming!
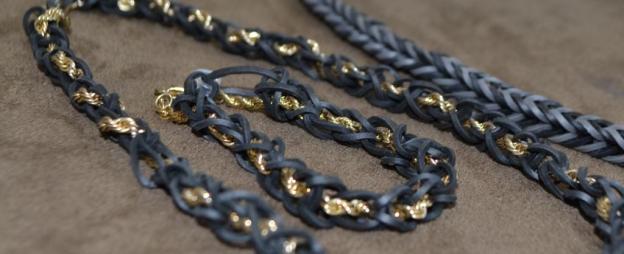
I wanted to match a shirt that was black and gold and none of the Rainbow Loom colors seemed right. So, I just added my own gold necklace and bracelet. This is a basic/standard Rainbow Loom chain. Afterwards I just weaved/threaded the gold chain through each loop by hand. This works best with a necklace that is big enough to put on without stretching. I really like the way it turned out.

Triple-single with beads
Here is a triple single Rainbow Loom bracelet that I made for my son. It’s easier than you might think, although getting the beads on was the hardest part. I used letter beads from Michaels and put them through the center chain. As I was doing a loop, I would pull the rubber band up and hold it with my fingers to thread the bead through before looping the band on the next peg.
Here are a couple of links to videos that show how to make the triple single.
Rainbow Loom® “Triple single pattern” rubber band
How to Make A All Around Triple Rainbow Loom Bracelet Tutorial
This link is a downloadable pdf file that shows the instructions step-by-step.
Triple Single pattern pdf from rainbowloom.com
Here is a link to a clip of New Jersey governor Chris Christie talking about his daughter making Rainbow Loom bands:
Make longer Rainbow Loom chains
If you’ve made the standard Rainbow Loom bracelet as described in the instructions and want to make something longer, here is the trick! First, link together the bands as usual on the loom.
Step 1
Then, use hook to remove the top end of the chain (step 1).
Step 2
Pull the chain off while keeping the final loop on the hook (step 2).

Step 3
Go ahead and put on the bands for the next section of chain. Then use your hook to place the end of the first chain over the starting peg for the next section of chain (step 3).

Step 4
To make it easier to grab the first band in this next section, pull down on the portion of the chain that is looped onto the first peg (step 4).
